- Published on
Recreate the 1.1.1.1 Hero Animation with QML
- Authors

- Name
- Mai H. Son (Mason)
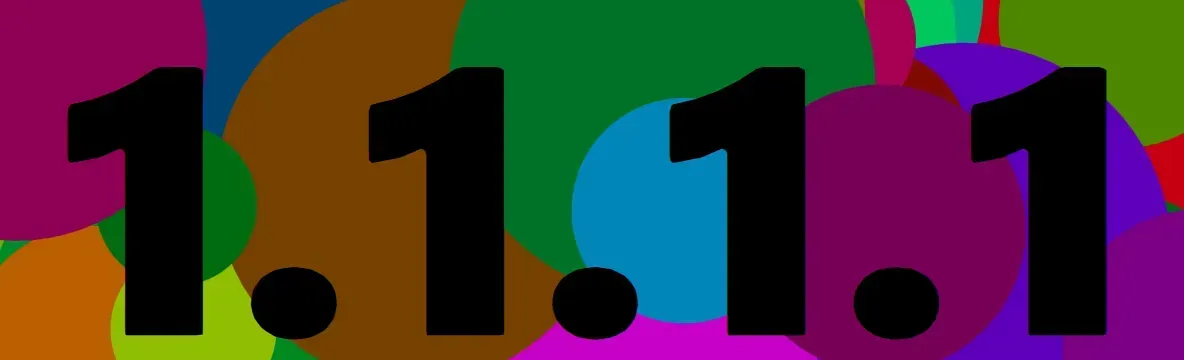
Once I visited the landing page of 1.1.1.1 (Cloudflare DNS), the hero image caught my attention. At the time, I was doing some QML development, so I thought, can I recreate this animation with QML?
The Analysis
The animation is a slowly moving colorful background under a text mask.
There are many ways to achieve this effect:
- Create a whole GIF or video from some program like After Effects.
- Create the background image using some image editor and animate it under the text mask.
- Create the background at runtime using shapes.
I'll go with the third option; the other two are not very interesting.
The original background has some colorful curves, but to simplify, I will go with circles instead.
The Implementation
First, we need to create a Circle component, which will be used to create the background.
// Circle.qml
import QtQuick 2.0

Rectangle {
    property real centerX: 0
    property real centerY: 0
    property real diameter: radius * 2

    width: radius * 2
    height: radius * 2

    x: centerX - radius
    y: centerY - radius
}
Now from main.qml, create a Circle and do some sliding animation.
Item {
    id: background
    width: 800
    height: 250

    Circle {
        id: circle

        radius: Math.random() * 100 + 50
        centerY: Math.random() * parent.height
        color: randomColor()

        NumberAnimation {
            readonly property real velocity: 150 // pixels/s

            target: circle
            property: "centerX"
            running: true
            duration: (Math.abs(from - to) / velocity) * 1000
            from: Math.random() * background.width * 2 - background.width
            to: -circle.diameter

            onFinished: {
                from = background.width + Math.random() * 200 + circle.diameter
                restart()
            }
        }
    }
}
In short, it will create a circle with random radius and color, put it in a random position, and animate it from the right to the left of the screen.
When the animation finishes, move the circle back to the right side of the screen and restart.
Now, use Repeater to create a bunch of them, let's say, 200.
Repeater {
    model: 200

    Circle {
        ...
    }
}
We are nearly there. Now hide the background for a bit, create a large Text item.
Text {
    id: mask
    anchors.fill: parent
    verticalAlignment: Text.AlignVCenter
    horizontalAlignment: Text.AlignHCenter
    font.pixelSize: 250
    font.weight: Font.Black
    text: "1.1.1.1"
}
Now the final magic, using QML's OpacityMask, we can make only the part of the background that is under the text visible.
OpacityMask {
    anchors.fill: parent
    source: background
    maskSource: mask
}
Make sure to set background and mask components to invisible; otherwise, they will be shown twice.
The Final Code
import QtQuick 2.15
import QtQuick.Window 2.15
import QtQuick.Controls 2.12
import Qt5Compat.GraphicalEffects

ApplicationWindow {
    width: 800
    height: 250
    visible: true

    function randomColor() {
        // Generate random color, not too dark, not too bright
        return Qt.hsla(Math.random(), 1, Math.random() * 0.2 + 0.2, 1)
    }

    Item {
        id: background
        width: 800
        height: 250
        visible: false

        Repeater {
            model: 200

            Circle {
                id: circle

                radius: Math.random() * 100 + 50
                centerY: Math.random() * parent.height
                color: randomColor()

                NumberAnimation {
                    readonly property real velocity: 150 // pixels/s

                    target: circle
                    property: "centerX"
                    running: true
                    duration: (Math.abs(from - to) / velocity) * 1000
                    from: Math.random() * background.width * 2 - background.width
                    to: -circle.diameter

                    onFinished: {
                        from = background.width + Math.random() * 200 + circle.diameter
                        restart()
                    }
                }
            }
        }
    }

    Text {
        id: mask
        anchors.fill: parent
        verticalAlignment: Text.AlignVCenter
        horizontalAlignment: Text.AlignHCenter
        font.pixelSize: 250
        font.weight: Font.Black
        text: "1.1.1.1"
        visible: false
    }

    OpacityMask {
        anchors.fill: parent
        source: background
        maskSource: mask
    }
}
And the Result
Conclusion
The result is kind of similar to the original one, but not exactly the same. But you get the idea of how to use the OpacityMask to create eye-catching animations.
Hope you learned something new today, and happy coding!
Comments powered by Talkyard.